
Please, have in mind that SpyHunter offers a free 7-day Trial version with full functionality. Credit card is required, no charge upfront.
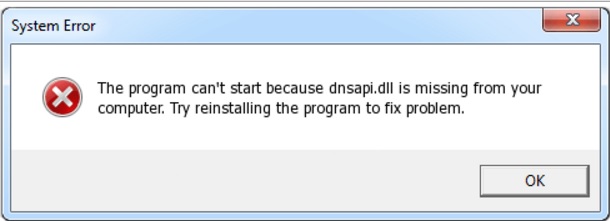
What is Dnsapi.dll Not Found Error?
Dnsapi.dll Not Found Error is usually caused by a Trojan. To be more precise, the virus you’re now stuck with is called Win32/Patched.AO. The problem is that a virus has modified an Important Windows Operating System File. For some reason the file has been patched – meaning a malicious code was injected into it. Once removed the error will start bothering you. It goes without saying you don’t want to leave a Trojan horse wreak havoc on your computer system. This pest poses an immense threat for your privacy and safety, it’s resourceful and aggressive. Long story short, Trojans are dreaded for a reason. These infections serve as a back door to malware. They also mess with your default settings and spy on your personal data. Win32/Patched.AO is no exception. Now, what exactly is this error? Dll (the abbreviation stands for Dynamic Link Library) files are very similar to .exe files. They contain code and data which multiple programs could use at the same time. More often than not, you come across DLL errors when you start the PC or during a program startup. Dll files not only use fewer resources but also ease program updates. These files are extremely beneficial. They are frequently used and their number on board is quite large. Therefore, messing with Dll files inevitably causes a confusion. Back to your problem; the Dnsapi.dll file is the one we’ll be focusing on right now. This library file is related to Internet access which explains why it’s an often target for infections. When your PC gets infected, the Dnsapi.dll Not Found Error starts popping up.

The pop-up itself differs; you may notice a couple of variants. “Dnsapi.dll not found.”, “Cannot find C:\Windows\System32\\dnsapi.dll.”, “The file Dnsapi.dll is missing.”, “Dnsapi.dll Access Violation.”, etc. Seeing any of those means your machine is no longer infection-free. The pop-ups appear mainly during a system start-up or when some program attempts to get access to Dnsapi.dll. Remember, you have to delete the Trojan itself! If you try to just replace the Dnsapi.dll file, the parasite remains. And having a Trojan horse surely guarantees a horrible cyber experience. This pest alters you system settings in complete and utter silence. Furthermore, some important system files may get damaged as well. Trojans’ main goal is to grant their developers remote control over your machine. If the Win32/Patched.AO infection manages to spend enough time on board, its malicious plans might succeed. Don’t take any unnecessary risks with this virus. Instead, get rid of it. This pest is also spying on your sensitive information while being on board. Having your private data monitored is extremely dangerous and in the worst case scenario, it will lead to identity theft. To prevent further harm, you have to tackle the Trojan.
How did I get infected with?
Despite being virulent infections, at the end of the day Trojans are still PC programs. Therefore, they have to be properly installed first. You see where this is going, don’t you? This parasite didn’t just appear out of the blue; it was installed. Keep in mind how deceptive and stealthy viruses could be; they get spread online in silence. That means at some point in the recent past the Win32/Patched.AO Trojan asked for your permission and you agreed to download it. Of course, you didn’t necessarily need to know what you’re agreeing to. Infections often pretend to be software updates or they get attached to freeware/shareware bundles. Some of the oldest infiltration techniques are still quite efficient. For example, watch out for spam email-attachments and spam messages from unknown senders. It should be your number one priority to protect your PC from malware. To achieve that, keep an eye out for anything malicious you may come cross online. You won’t regret it. Last but not least, remember, it’s much easier to prevent installation than to delete a virus later on.
Why is this dangerous?
The Fix Dnsapi.dll Not Found errors are a sign that something very sneaky and very dangerous is now on board. Don’t waste any time. You see, as soon as the parasite lands on your PC system, it begins to wreak havoc. Trojans are considered to be among the most destructive infections out there and you’re now stuck with a Trojan. Such a situation is, to put it mildly, unsafe. The parasite may change your system registry or modify your default settings. What is much worse though, is that this program spies on your private information. Passwords, usernames, email addresses, IP addresses, search queries, browsing history, etc – hackers have access to all of this. If you’re particularly unfortunate, the Trojan might even steal some personally identifiable data. Yes, your very own bank account is now jeopardized. Do the right thing concerning your cyber security and privacy; get rid of the virus, To do so manually, please follow the detailed removal guide you’ find down below.
Remove Trojan Patched.AO and Fix Dnsapi.dll Not Found Error

Please, have in mind that SpyHunter offers a free 7-day Trial version with full functionality. Credit card is required, no charge upfront.
If you feel technical enough you may proceed with Manual Virus Removal
If you perform exactly the steps below you should be able to remove the Trojan Patched.AO infection. Please, follow the procedures in the exact order. Please, consider to print this guide or have another computer at your disposal. You will NOT need any USB sticks or CDs.
STEP 1: Stop the malicious process using Windows Task Manager
- Open your task Manager by pressing CTRL+SHIFT+ESC keys simultaneously
- Locate the process of the ransomware. Have in mind that this is usually a random generated file.
- Before you kill the process, type the name on a text document for later reference.

- Locate any suspicious processes associated with the Virus.
- Right click on the process
- Open File Location
- End Process
- Delete the directories with the suspicious files.
- Have in mind that the process can be hiding and very difficult to detect
STEP 2: Reveal Hidden Files
- Open any folder
- Click on “Organize” button
- Choose “Folder and Search Options”
- Select the “View” tab
- Select “Show hidden files and folders” option
- Uncheck “Hide protected operating system files”
- Click “Apply” and “OK” button
STEP 3: Locate the Virus startup location
- Once the operating system loads press simultaneously the Windows Logo Button and the R key.
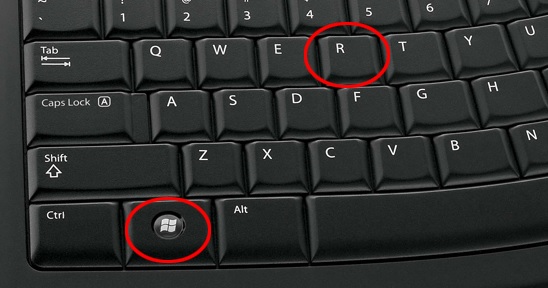
- A dialog box should open. Type “Regedit”
- WARNING! be very careful when editing the Microsoft Windows Registry as this may render the system broken.
Depending on your OS (x86 or x64) navigate to:
[HKEY_CURRENT_USER\Software\Microsoft\Windows\CurrentVersion\Run] or
[HKEY_LOCAL_MACHINE\SOFTWARE\Microsoft\Windows\CurrentVersion\Run] or
[HKEY_LOCAL_MACHINE\SOFTWARE\Wow6432Node\Microsoft\Windows\CurrentVersion\Run]
- and delete the display Name: [RANDOM]

- Then open your explorer and navigate to:
Navigate to your %appdata% folder and delete the executable.
You can alternatively use your msconfig windows program to double check the execution point of the virus. Please, have in mind that the names in your machine might be different as they might be generated randomly, that’s why you should run any professional scanner to identify malicious files.
STEP 6: Make sure your Windows HOSTS file is clean
- open your explorer and Navigate to %windir%/system32/Drivers/etc/host
If you are hacked, there will be foreign IPs addresses connected to you at the bottom. Take a look below:
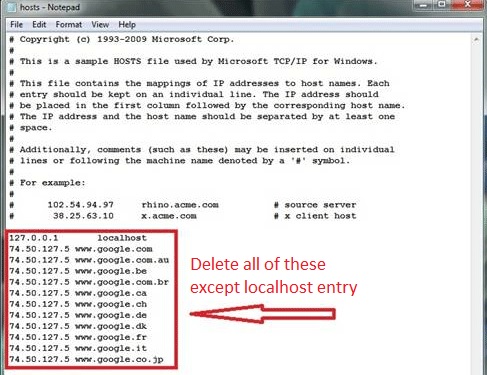
If you are uncertain about the IPs below “Localhost” contact us in out google+ profile and we will try to help you.
STEP 7: Check your internet connection settings
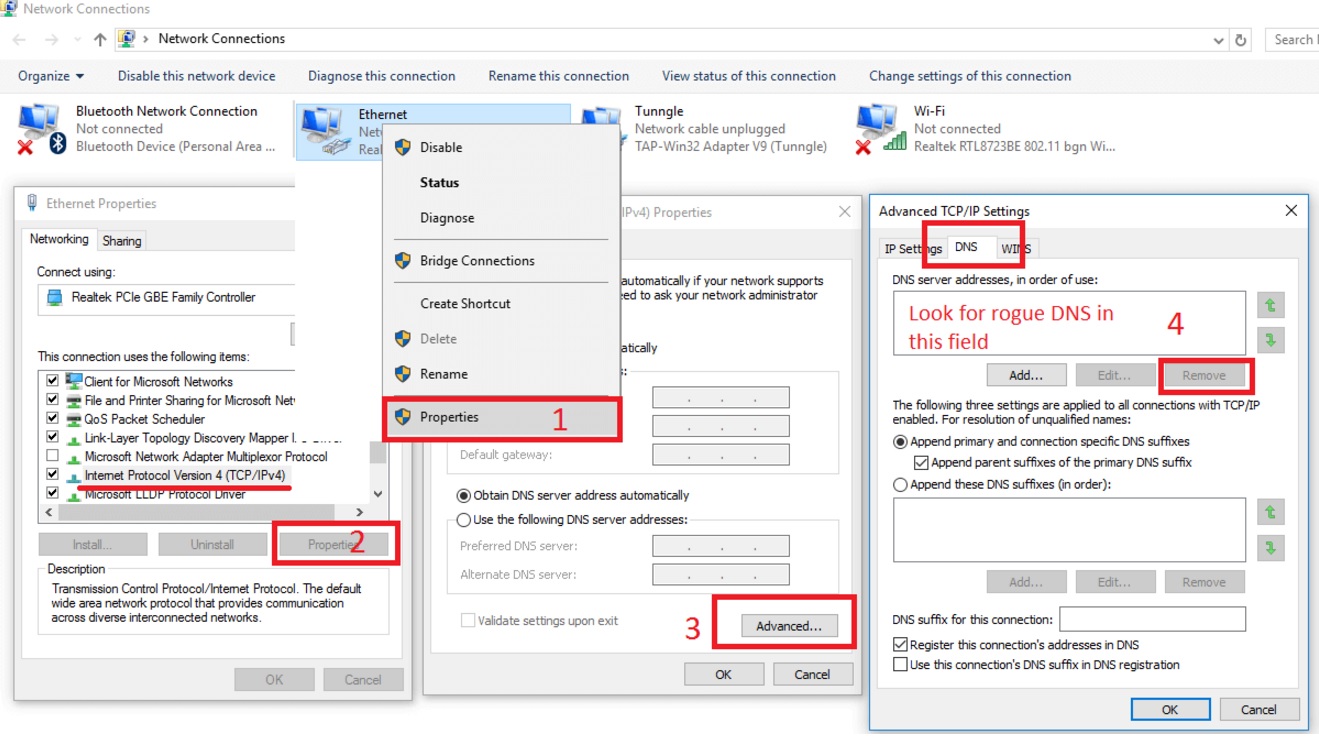
- Right-click on the active Network Adapter, Click on Properties
- Navigate to Internet Protocol Version 4 (ICP/IP), click Properties.
- Click on Advanced and then navigate to the DNS TAB. The DNS line should be set to Obtain DNS server automatically. If it is not, set it yourself.
Double check your proxy settings as the malware is capable of modifying them.
Attention! this can break your internet connection. Before you change your DNS settings to use Google Public DNS for example, be sure to write down the current server addresses on a piece of paper.
To fix the damage done by the virus you need to do the following.
- Click the Windows Start button to open the Start Menu, type control panel in the search box and select Control Panel in the results displayed above.
- go to Network and Internet
- then Network and Sharing Center
- then Change Adapter Settings
- Right-click on your active internet connection and click properties. Under the Networking tab, find Internet Protocol Version 4 (TCP/IPv4). Left click on it and then click on properties. Both options should be automatic! By default it should be set to “Obtain an IP address automatically” and the second one to “Obtain DNS server address automatically!” If they are not just change them, however if you are part of a domain network you should contact your Domain Administrator to set these settings, otherwise the internet connection will break!!!
STEP 8: Check your Scheduled Tasks
- Open your windows task scheduler and delete any suspicious program. Usually, adware applications hide their droppers in here. Even if you remove the whole infection from the system files – the dropper will regenerate everything and the nightmare will start again.

Step 9: Repair system files.
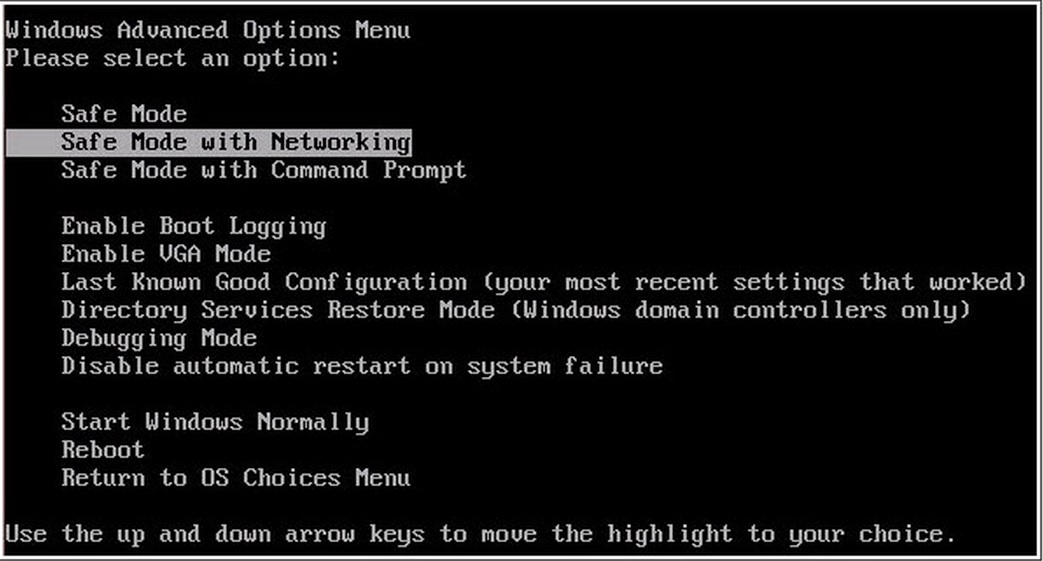
For this step you need to start Your Computer into Safe Mode with Networking
- Make sure you do not have any floppy disks, CDs, and DVDs inserted in your computer
- Restart the computer
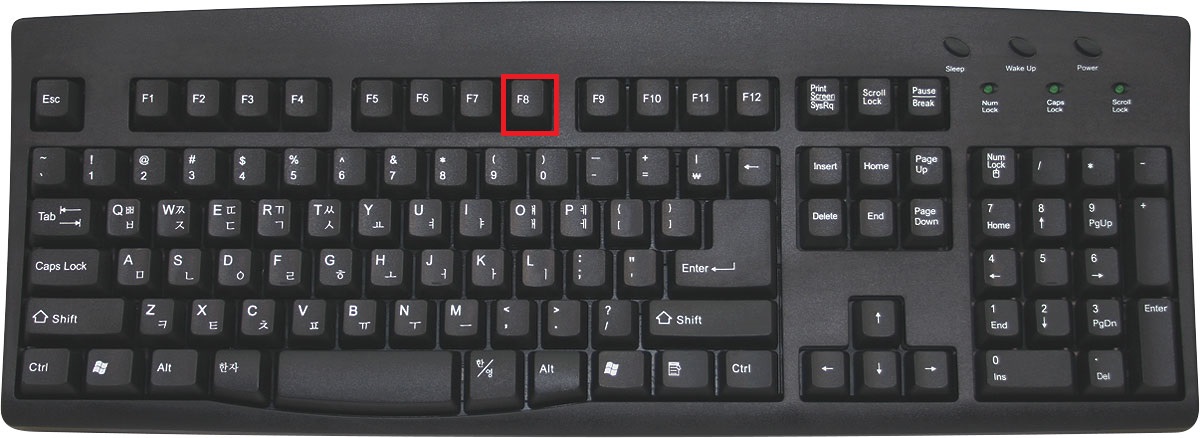
- When you see a table, start tapping the F8 key every second until you enter the Advanced Boot Options
- For Windows 8, press the Windows key + C, and then click Settings. Click Power, hold Shift Key and click Restart, then click on Troubleshoot and select Advanced options. In the Advanced Options screen, choose Startup Settings, then hit Restart. When in safe mode go to Enable Safe Mode with Networking.
- If you are using Windows XP, Vista or 7 in the Advanced Boot Options screen, use the arrow keys to highlight Safe Mode with Networking, and then press ENTER.
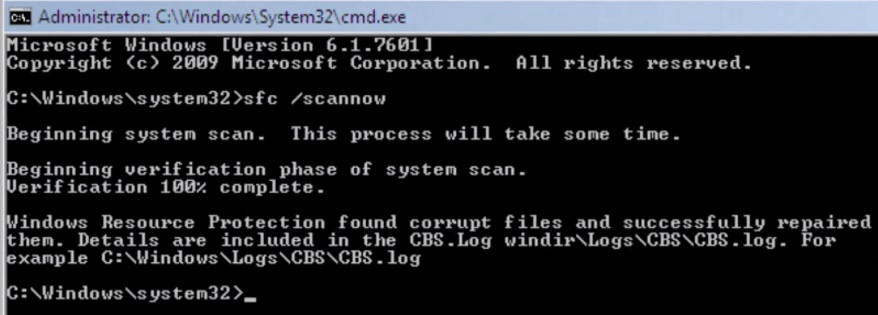
- Once you have rebooted in Safe Mode type “cmd” in the Search Field.
- Right Click on it and choose Run as Administrator.
- In the new window that will appear type sfc /scannow and press Enter.
- Wait for the verification process to finish.
- You should get the following message:
At this point, you should not experience the DNSAPI.dll missing error anymore. To make sure manual removal is successful, we recommend to use a free scanner of any professional antimalware program to identify malware registry leftovers or temporary files.