
Please, have in mind that SpyHunter offers a free 7-day Trial version with full functionality. Credit card is required, no charge upfront.
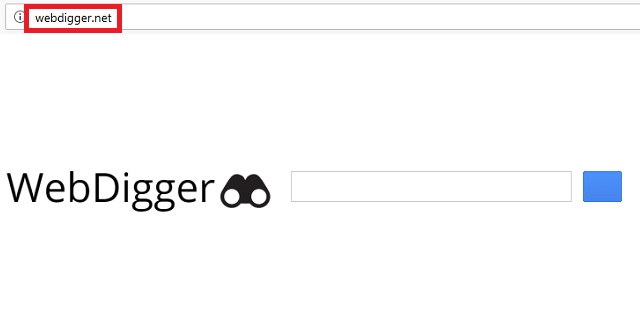
Can’t Remove Webdigger.net hijacker virus? This page includes detailed Webdigger.net Removal instructions!
If you come to find the Webdigger.net page on your screen, be wary. It’s an indication of an invasion. The site showing up is a big bright neon sign that screams ‘Hijacker!’ Consider it a clue. The site warns of the hijacker’s presence on your computer. It won’t take long before you start to notice its meddling. You can’t escape the consequences of the cyber threat’s stay. They start to manifest as soon as the infection settles. And, with time, they grow and worsen. The absolute worst issue, you face, concerns your security. The hijacker, lurking behind Webdigger.net, jeopardizes your privacy. It follows programming to spy on you. So, once it invades, it starts to keep track of your online activities. The tool monitors every single move you make, and records it. After it determines it has collected enough data from you, it proceeds to send what it stole. That’s right. It exposes the stolen information to the cyber criminals, behind it. Unknown individuals with malicious intentions. Those are not people, you can trust with your sensitive data. Protect it! Don’t allow to get your private details stolen and exposed! Keep your personal and financial information hidden from prying eyes. Delete the dreadful infection as soon as the opportunity presents itself. Webdigger.net is your sign. It urges you into action. So, once you spot it, act!

How did I get infected with?
Webdigger.net doesn’t pop up out of thin air. Sure, it may seem that way. But, in reality, it shows up, courtesy of the hijacker, using it as a face. As for the hijacker itself, it’s there because of you. Oh, yes. You take the responsibility for its presence. It’s on your computer, because you allowed it to be. It may seem confusing, but it’s pretty straightforward. A hijacker needs user’s approval before it can install itself. So, before admission, it must ask for your permission. It can only proceed after you give it the green light. But if an infection seeks your consent on its install, you’d deny it, right? That’s why, the tool doesn’t leave its fate to chance. To avoid the risk of rejection, it turns to trickery. It’s NOT outright with its advances, but quite the opposite. It’s sneaky. The hijacker uses the most covert methods of invasion to slither in undetected. It turns to freeware, spam emails, fake updates, the usual means. There’s an entire array of methods, it can use, but do you know what? They all rely on your carelessness. The infection’s success rests on it. It needs you to rush, and not bother to do your due diligence. Why oblige? Do what’s best for you, and your system, and do the opposite. Be extra thorough. Always take the time to do your due diligence. Even a little extra attention goes a long way. Remember that next time you install anything off the web.
Why is this dangerous?
Webdigger.net takes over your screen. The hijacker forces the page on you, non-stop. It doesn’t leave you to make a single online move, without forcing it on you. Open a new tab? Type in a search? You best believe the site is everywhere. It even takes over your default search engine and homepage. Oh, yes! One day, you come to find the switch, already in place. You neither approved it nor requested it. But it’s there. Hijackers have that power. They can force a variety of reshuffles on you. That’s part of what makes them such dangerous infections. What if the tool, you’re stuck with, chooses to flood your PC with malware? Well, it can! If it so decides, it can install as many more unwanted malicious program as it feels like. And, you’ll be stuck dealing with further grievances. Don’t let that happen. Protect yourself from the hijacker’s influences. Get rid of it the first chance you get. The sooner you remove it, the better. The display of Webdigger.net is your warning. Heed it.
How to Remove Webdigger.net virus
The Webdigger.net infection is specifically designed to make money to its creators one way or another. The specialists from various antivirus companies like Bitdefender, Kaspersky, Norton, Avast, ESET, etc. advise that there is no harmless virus.
If you perform exactly the steps below you should be able to remove the Webdigger.net infection. Please, follow the procedures in the exact order. Please, consider to print this guide or have another computer at your disposal. You will NOT need any USB sticks or CDs.

Please, have in mind that SpyHunter offers a free 7-day Trial version with full functionality. Credit card is required, no charge upfront.
STEP 1: Track down Webdigger.net related processes in the computer memory
STEP 2: Locate Webdigger.net startup location
STEP 3: Delete Webdigger.net traces from Chrome, Firefox and Internet Explorer
STEP 4: Undo the damage done by the virus
STEP 1: Track down Webdigger.net related processes in the computer memory
- Open your Task Manager by pressing CTRL+SHIFT+ESC keys simultaneously
- Carefully review all processes and stop the suspicious ones.

- Write down the file location for later reference.
Step 2: Locate Webdigger.net startup location
Reveal Hidden Files
- Open any folder
- Click on “Organize” button
- Choose “Folder and Search Options”
- Select the “View” tab
- Select “Show hidden files and folders” option
- Uncheck “Hide protected operating system files”
- Click “Apply” and “OK” button
Clean Webdigger.net virus from the windows registry
- Once the operating system loads press simultaneously the Windows Logo Button and the R key.
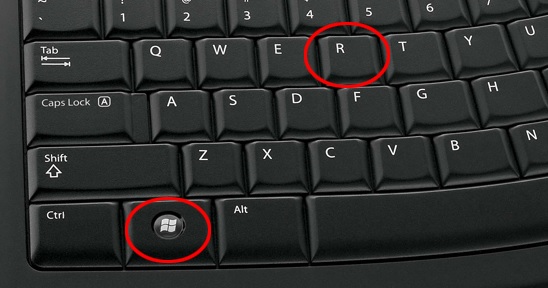
- A dialog box should open. Type “Regedit”
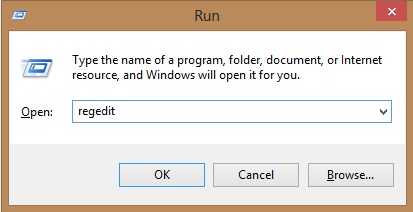
- WARNING! be very careful when editing the Microsoft Windows Registry as this may render the system broken.
Depending on your OS (x86 or x64) navigate to:
[HKEY_CURRENT_USER\Software\Microsoft\Windows\CurrentVersion\Run] or
[HKEY_LOCAL_MACHINE\SOFTWARE\Microsoft\Windows\CurrentVersion\Run] or
[HKEY_LOCAL_MACHINE\SOFTWARE\Wow6432Node\Microsoft\Windows\CurrentVersion\Run]
- and delete the display Name: [RANDOM]

- Then open your explorer and navigate to: %appdata% folder and delete the malicious executable.
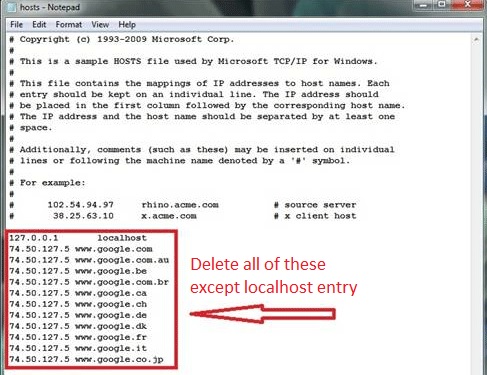
Clean your HOSTS file to avoid unwanted browser redirection
Navigate to %windir%/system32/Drivers/etc/host
If you are hacked, there will be foreign IPs addresses connected to you at the bottom. Take a look below:
STEP 3 : Clean Webdigger.net traces from Chrome, Firefox and Internet Explorer
-
Open Google Chrome
- In the Main Menu, select Tools then Extensions
- Remove the Webdigger.net by clicking on the little recycle bin
- Reset Google Chrome by Deleting the current user to make sure nothing is left behind

-
Open Mozilla Firefox
- Press simultaneously Ctrl+Shift+A
- Disable the unwanted Extension
- Go to Help
- Then Troubleshoot information
- Click on Reset Firefox

-
Open Internet Explorer
- On the Upper Right Corner Click on the Gear Icon
- Click on Internet options
- go to Toolbars and Extensions and disable the unknown extensions
- Select the Advanced tab and click on Reset

- Restart Internet Explorer
Step 4: Undo the damage done by Webdigger.net
This particular Virus may alter your DNS settings.
Attention! this can break your internet connection. Before you change your DNS settings to use Google Public DNS for Webdigger.net, be sure to write down the current server addresses on a piece of paper.
To fix the damage done by the virus you need to do the following.
- Click the Windows Start button to open the Start Menu, type control panel in the search box and select Control Panel in the results displayed above.
- go to Network and Internet
- then Network and Sharing Center
- then Change Adapter Settings
- Right-click on your active internet connection and click properties. Under the Networking tab, find Internet Protocol Version 4 (TCP/IPv4). Left click on it and then click on properties. Both options should be automatic! By default it should be set to “Obtain an IP address automatically” and the second one to “Obtain DNS server address automatically!” If they are not just change them, however if you are part of a domain network you should contact your Domain Administrator to set these settings, otherwise the internet connection will break!!!
You must clean all your browser shortcuts as well. To do that you need to
- Right click on the shortcut of your favorite browser and then select properties.
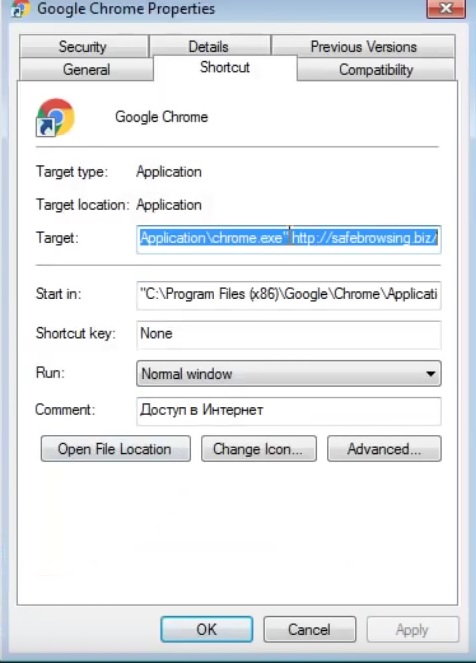
- in the target field remove Webdigger.net argument and then apply the changes.
- Repeat that with the shortcuts of your other browsers.
- Check your scheduled tasks to make sure the virus will not download itself again.
How to Permanently Remove Webdigger.net Virus (automatic) Removal Guide
Please, have in mind that once you are infected with a single virus, it compromises your whole system or network and let all doors wide open for many other infections. To make sure manual removal is successful, we recommend to use a free scanner of any professional antimalware program to identify possible registry leftovers or temporary files.