
Please, have in mind that SpyHunter offers a free 7-day Trial version with full functionality. Credit card is required, no charge upfront.
Csync.php just keeps popping up and you cannot remove it?
One of the many Trojans Scripts that roam the Web nowadays is called Csync.php. Yes, you have accidentally infected yourself by a particularly nasty Trojan horse. It goes without saying that you have to take measures as soon as possible. Trojans are considered to be among the most dreaded kinds of infections for a reason. Numerous reasons, actually. These programs are both impressively stealthy and very dangerous. That means keeping the virus on your machine would be a crucial, colossal mistake. Csync.php could easily cause you irreversible harm. Hence, the sooner you take action, the better. Make no mistake; this program is harmful. Don’t take any chances with Csync.php and get rid of it ASAP. Now, the Trojan starts wreaking havoc immediately after installation. Csync.php changes your default PC settings without any permission or authorization. It also modifies important system files. Furthermore, it might damage some of them. The parasite’s presence may lead to data loss as well. You see, now that the PC is compromised, your online experience is no longer up to you. It’s up to hackers. Trojans aim at causing trouble and Csync.php is quite successful in that department. The virus takes up a lot of your CPU memory. Therefore, don’t be surprised when the device underperforms. Random system crashes and even the Blue Screen of Death might become a frequent sight on your PC. Using the computer in general once it gets infected is a rather challenging task. This way Csync.php effectively disturbs and harasses you. And that’s not even the worst part. The Trojan collects as much private information as possible. That includes browsing history, search queries, password, usernames, email addresses, IP addresses. However, Csync.php doesn’t stop there. Apart from your browsing-related data, the Trojan steals personally identifiable data as well. Yes, that means your bank account information is in danger. It also means hackers might get access to your online credentials. What’s even more troublesome is Csync.php’s ultimate goal. If this pest spends enough time on board, it will grant hackers remote control over your PC. We shouldn’t have to explain why this scenario must be prevented, right? The Trojan also serves as a back door to more viruses (usually ransomware). It exposes you to various threats and must be tackled as soon as possible.

How did I get infected with?
As mentioned already, Trojans are secretive. The Csync.php virus is no exception. This pest slithered itself on board in complete and utter silence. Infections could trick anybody so don’t be too harsh on yourself. However, there are a couple of simple steps which help you prevent malware installation. For example, stay away from unverified pages. More often than not, illegitimate websites are unreliable and potentially harmful. Also, keep an eye on the spam messages in your inbox. Trojans usually get spread online via spam messages and spam email-attachments. That means a single careless click could automatically install a whole bunch of viruses. Avoid random executables and suspicious torrents. Trust us when we say, preventing virus infiltration is the easier option. Having to delete a parasite later on is a much more problematic thing to do. Last but not least, restrain yourself from installing questionable freeware or shareware bundles. There might be some vicious program attached to the safe ones. Always take your time in the installation process and be cautious on the Internet.
Why is this dangerous?
Csync.php’s shenanigans are just as unexpected as they are dangerous. The parasite is lurking somewhere in the shadows of your PC system. It might take you a long time to even realize your machine is compromised. Due to this program’s unwanted presence, the computer is significantly slower. Your Internet connection might become unstable as well. In addition, your private life on the Web is no longer private. All your sensitive information gets sent into the wrong hands. You know, crooks will not think twice before they sell your data for marketing purposes. However, you end up in an extremely vulnerable position. These tricks pose the immense threat of financial scams. The absolute worst case scenario – identity theft, is also possible. Csync.php modifies your system registry to serve hackers’ malicious goals. One thing is certain, though, this program is dangerous. It brings to you nothing but trouble and must be deleted on the spot. To do so manually, please follow our comprehensive removal guide down below.
Manual Csync.php Removal Instructions

If you feel technical enough you may proceed with Manual Virus Removal
Please, have in mind that SpyHunter offers a free 7-day Trial version with full functionality. Credit card is required, no charge upfront.
If you perform exactly the steps below you should be able to remove the infection. Please, follow the procedures in the exact order. Please, consider to print this guide or have another computer at your disposal. You will NOT need any USB sticks or CDs.
STEP 1: Stop the malicious process using Windows Task Manager
- Open your task Manager by pressing CTRL+SHIFT+ESC keys simultaneously
- Locate the process of the ransomware. Have in mind that this is usually a random generated file.
- Before you kill the process, type the name on a text document for later reference.

- Locate any suspicious processes associated with the Virus.
- Right click on the process
- Open File Location
- End Process
- Delete the directories with the suspicious files.
- Have in mind that the process can be hiding and very difficult to detect
STEP 2: Reveal Hidden Files
- Open any folder
- Click on “Organize” button
- Choose “Folder and Search Options”
- Select the “View” tab
- Select “Show hidden files and folders” option
- Uncheck “Hide protected operating system files”
- Click “Apply” and “OK” button
STEP 3: Locate the Virus startup location
- Once the operating system loads press simultaneously the Windows Logo Button and the R key.
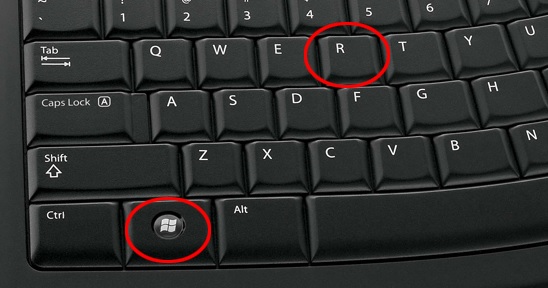
- A dialog box should open. Type “Regedit”
- WARNING! be very careful when editing the Microsoft Windows Registry as this may render the system broken.
Depending on your OS (x86 or x64) navigate to:
[HKEY_CURRENT_USER\Software\Microsoft\Windows\CurrentVersion\Run] or
[HKEY_LOCAL_MACHINE\SOFTWARE\Microsoft\Windows\CurrentVersion\Run] or
[HKEY_LOCAL_MACHINE\SOFTWARE\Wow6432Node\Microsoft\Windows\CurrentVersion\Run]
- and delete the display Name: [RANDOM]

- Then open your explorer and navigate to:
Navigate to your %appdata% folder and delete the executable.
You can alternatively use your msconfig windows program to double check the execution point of the virus. Please, have in mind that the names in your machine might be different as they might be generated randomly, that’s why you should run any professional scanner to identify malicious files.
STEP 4 : Uninstall unknown programs from Your Computer
Simultaneously press the Windows Logo Button and then “R” to open the Run Command

Type “Appwiz.cpl”

Locate the any unknown program and click on uninstall/change. To facilitate the search you can arrange the programs by date. review the most recent installed programs first. In general you should remove all unknown programs.
STEP 5 : Remove add-ons and extensions from Chrome, Firefox or IE
Remove from Google Chrome
- In the Main Menu, select Tools—> Extensions
- Remove any unknown extension by clicking on the little recycle bin
- If you are not able to delete the extension then navigate to C:\Users\”computer name“\AppData\Local\Google\Chrome\User Data\Default\Extensions\and review the folders one by one.
- Reset Google Chrome by Deleting the current user to make sure nothing is left behind

- If you are using the latest chrome version you need to do the following
- go to settings – Add person

- choose a preferred name.
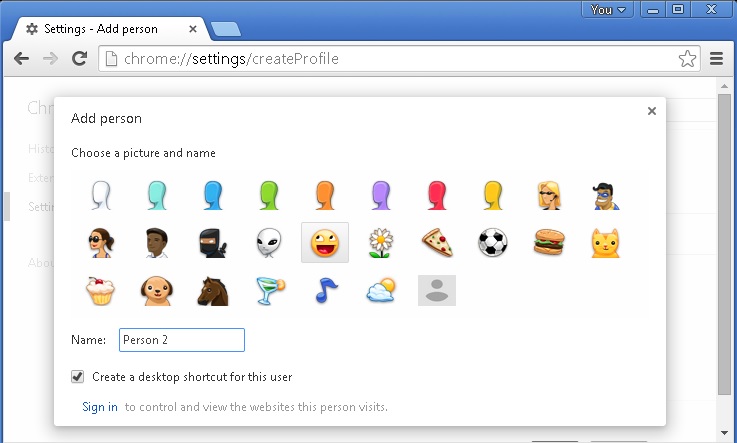
- then go back and remove person 1
- Chrome should be malware free now
Remove from Mozilla Firefox
- Open Firefox
- Press simultaneously Ctrl+Shift+A
- Disable and remove any unknown add on
- Open the Firefox’s Help Menu
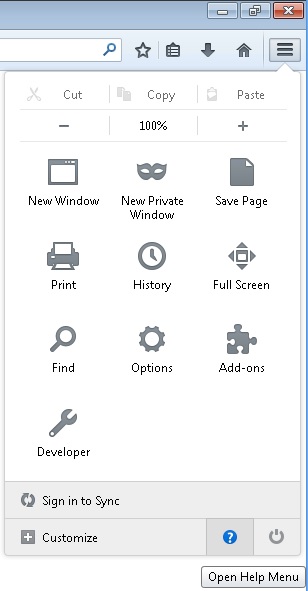
- Then Troubleshoot information
- Click on Reset Firefox

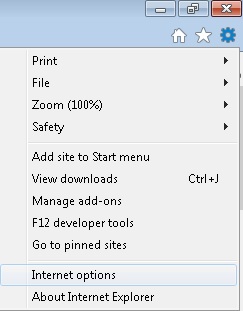
Remove from Internet Explorer
- Open IE
- On the Upper Right Corner Click on the Gear Icon
- Go to Toolbars and Extensions
- Disable any suspicious extension.
- If the disable button is gray, you need to go to your Windows Registry and delete the corresponding CLSID
- On the Upper Right Corner of Internet Explorer Click on the Gear Icon.
- Click on Internet options
- Select the Advanced tab and click on Reset.
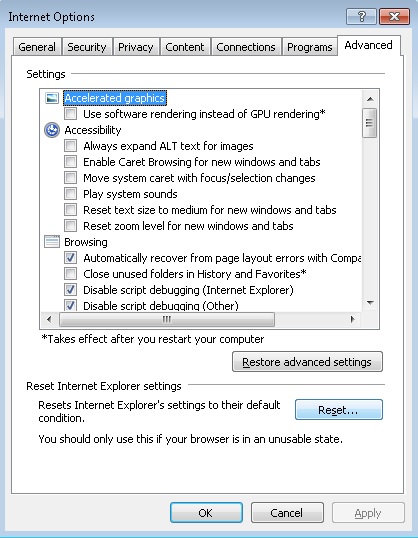
- Check the “Delete Personal Settings Tab” and then Reset

- Close IE
STEP 6: Make sure your Windows HOSTS file is clean
- open your explorer and Navigate to %windir%/system32/Drivers/etc/host
If you are hacked, there will be foreign IPs addresses connected to you at the bottom. Take a look below:
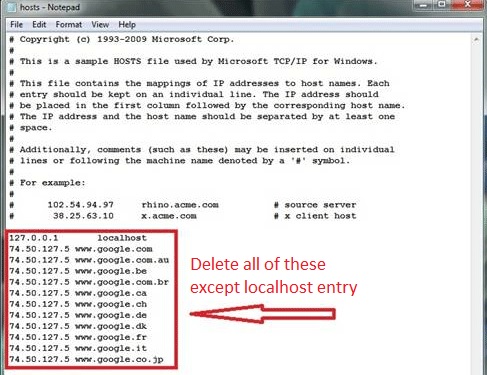
If you are uncertain about the IPs below “Localhost” contact us in out google+ profile and we will try to help you.
STEP 7: Check your internet connection settings
- Right-click on the active Network Adapter, Click on Properties
- Navigate to Internet Protocol Version 4 (ICP/IP), click Properties.
- Click on Advanced and then navigate to the DNS TAB. The DNS line should be set to Obtain DNS server automatically. If it is not, set it yourself.
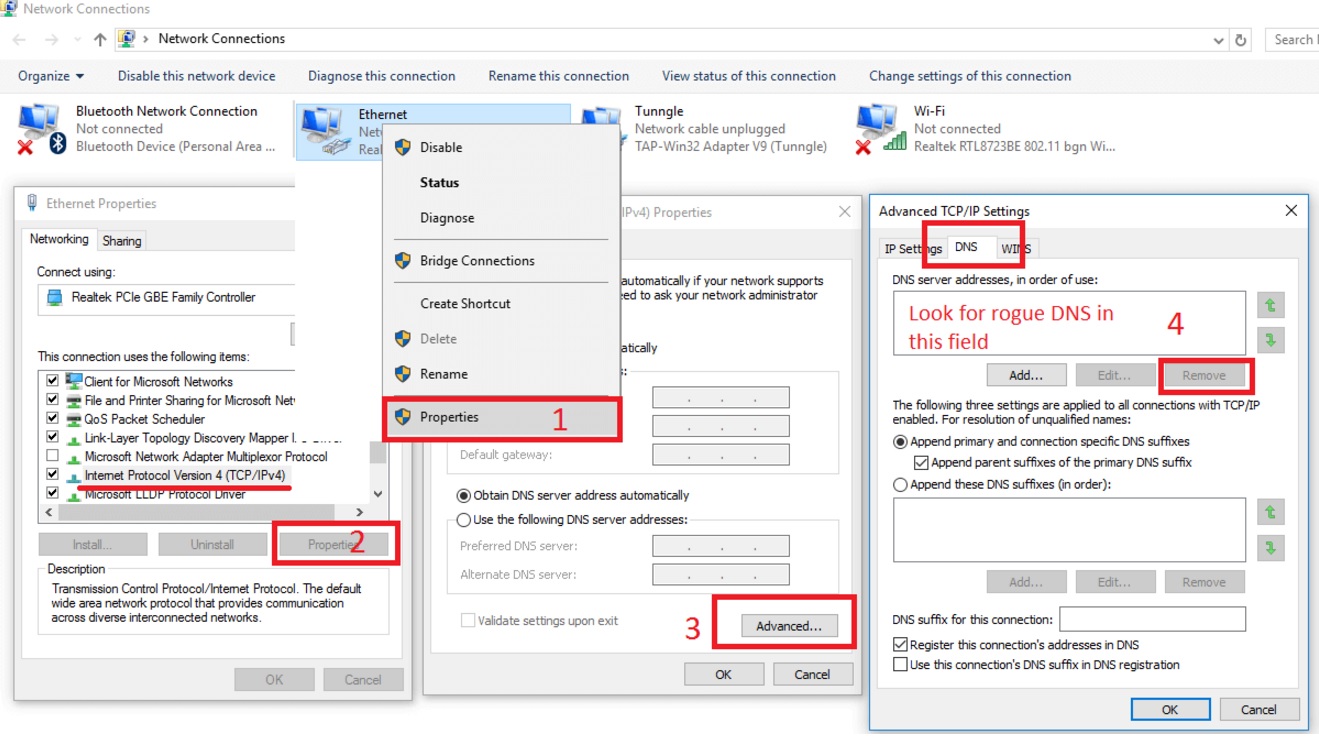
Double check your proxy settings as the malware is capable of modifying them.
Attention! this can break your internet connection. Before you change your DNS settings to use Google Public DNS for example, be sure to write down the current server addresses on a piece of paper.
To fix the damage done by the virus you need to do the following.
- Click the Windows Start button to open the Start Menu, type control panel in the search box and select Control Panel in the results displayed above.
- go to Network and Internet
- then Network and Sharing Center
- then Change Adapter Settings
- Right-click on your active internet connection and click properties. Under the Networking tab, find Internet Protocol Version 4 (TCP/IPv4). Left click on it and then click on properties. Both options should be automatic! By default it should be set to “Obtain an IP address automatically” and the second one to “Obtain DNS server address automatically!” If they are not just change them, however if you are part of a domain network you should contact your Domain Administrator to set these settings, otherwise the internet connection will break!!!
STEP 8: Check your Scheduled Tasks
- Open your windows task scheduler and delete any suspicious program. Usually, adware applications hide their droppers in here. Even if you remove the whole infection from the system files – the dropper will regenerate everything and the nightmare will start again.

Step 9: Check for Virus Leftovers
To make sure manual removal is successful, we recommend to use a free scanner of any professional antimalware program to identify any registry leftovers or temporary files and to prevent this from happening again.