Please, have in mind that SpyHunter offers a free 7-day Trial version with full functionality. Credit card is required, no charge upfront.
How to Remove Nesa Ransomware?
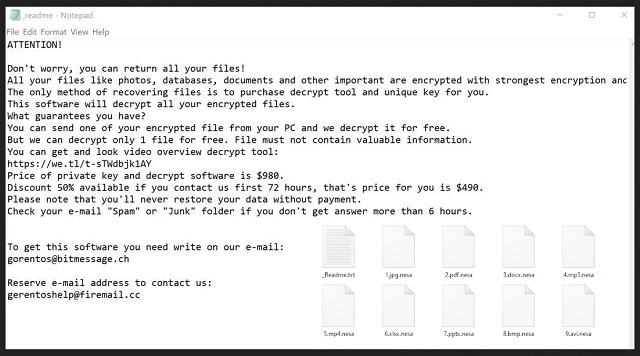
Readers recently started to report the following message being displayed when they boot their computer:
ATTENTION!
Don’t worry, you can return all your files!
All your files like photos, databases, documents and other important are encrypted with strongest encryption and unique key.
The only method of recovering files is to purchase decrypt tool and unique key for you.
This software will decrypt all your encrypted files.
What guarantees you have?
You can send one of your encrypted file from your PC and we decrypt it for free.
But we can decrypt only 1 file for free. File must not contain valuable information.
You can get and look video overview decrypt tool:
*Redacted for security reasons*
Price of private key and decrypt software is $980.
Discount 50% available if you contact us first 72 hours, that’s price for you is $490.
Please note that you’ll never restore your data without payment.
Check your e-mail “Spam” or “Junk” folder if you don’t get answer more than 6 hours.
To get this software you need write on our e-mail:
—
Reserve e-mail address to contact us:
—
Our Telegram account:
—
Nesa is a variant of the notorious STOP (DJVU) family. It belongs to the ransomware category, and it’s an atrocious cyber menace. The infection uses slyness to slither its way in. Then, once inside, spreads its clutches, and corrupts your PC. The tool uses encryption algorithms to seize control over your files. It locks the data, you have stored on your PC. Then, demands payment for its release. Yes, if you wish to unlock it, you have to pay a ransom. The Nesa threat leaves a ransom note for you. It’s a “_readme.txt” file, you can find on your Desktop. As well as, in each folder that contains encrypted data. It’s a rather standard note. It explains your current predicament, and gives you a way out. That way out is compliance, of course. The tool states that the only way to remove the encryption, is with a special key. A decryption key that will cost you $980. Supposedly, if you pay within the “first 72 hours,” you benefit from a “50% Discount.” Bear in mind, these are the promises of cyber kidnappers. Ask yourself, can you trust the words of extortionists? If your answer is anything other than ‘no,’ think again. You’re dealing with strangers with malicious intentions. People, who wish to exploit your fear and naivety. Don’t allow them to profit off of you. Don’t contact them. Don’t pay them a dime. Don’t reach out. Compliance is not the way to go. It brings you nothing but regrets.
How did I get infected with?
The Nesa menace uses deception to sneak into your PC. It turns to the old but gold invasive methods. One day, you receive an email. It appears to come from a well-known company, so you open it. It reads that you need to confirm a purchase, or look over your private information. And, to do so, you must click a link or download an attachment. If you blindly follow instruction, you get stuck with a cyber threat. Carelessness invites infections into your system. And, infections like Nesa, prey on carelessness. They rely on you to throw caution to the wind. To rush, and leave your fate to chance. To give into gullibility, and skip doing due diligence. Don’t oblige! Don’t make its infiltration easier. Always take the time to be thorough. Be vigilant, and remember that even a little extra attention goes a long way. Other invasive methods, Nesa can turn to, include the following. It can pose as a bogus system or program update. Or, lurk behind freeware, corrupted links, sites or updates. Remember that you’re the last line of defense. So, always be on your guard. Caution helps to keep an infection-free PC.
Why is Nesa dangerous?
Once Nesa strikes, you discover your files renamed. The tool attaches the ‘.nesa‘ extension at the end of each file, you have. Thus, solidifying its control. Pictures, documents, music, archives, videos. Everything gets the extension. Say, you have a photo called ‘today.jpg.’ After Nesa finishes with it, it becomes ‘today.jpg.nesa.’ After that, your data is inaccessible. The only way to change that, is with the decryption key. The one, you have to pay for, in order to get. But here’s the thing. You have zero guarantees that payment will accomplish anything. All, you have to go on, is the word of cyber criminals. And, these are hardly trustworthy individuals. Think about your options here. You can pay, and they can choose to send you nothing. Or, they can send you a key that does nothing. And, even if you get the proper one, don’t rejoice. The key removes the encryption, yes. But the infection that forces it on you, remains. So, if you pay, you don’t remove the cause for a problem. You remove a mere consequence. Don’t waste your money, time and energy, dealing with these people. The odds of them double-crossing you are more than substantial. To trust malicious strangers is a mistake. Don’t make it. It’s better to place your fate on cloud storage and backups.
Nesa Removal Instructions
Please, have in mind that SpyHunter offers a free 7-day Trial version with full functionality. Credit card is required, no charge upfront.
STEP 1: Kill the Malicious Process
STEP 3: Locate Startup Location
STEP 4: Recover Nesa Encrypted Files
STEP 1: Stop the malicious process using Windows Task Manager
- Open your task Manager by pressing CTRL+SHIFT+ESC keys simultaneously
- Locate the process of the ransomware. Have in mind that this is usually a random generated file.
- Before you kill the process, type the name on a text document for later reference.
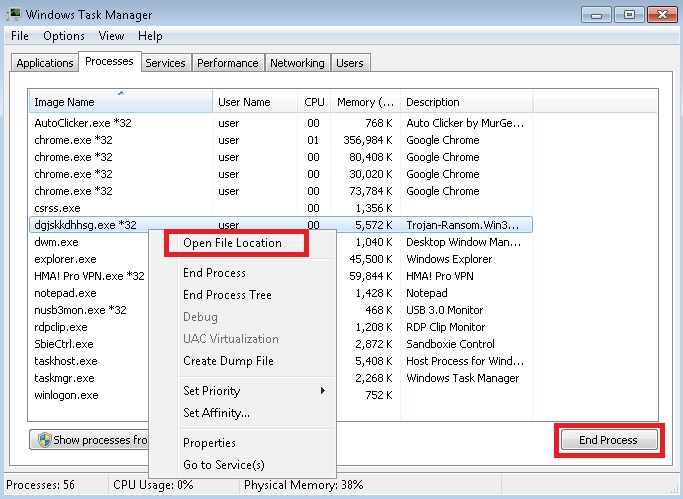
- Locate any suspicious processes associated with Nesa encryption Virus.
- Right click on the process
- Open File Location
- End Process
- Delete the directories with the suspicious files.
- Have in mind that the process can be hiding and very difficult to detect
STEP 2: Reveal Hidden Files
- Open any folder
- Click on “Organize” button
- Choose “Folder and Search Options”
- Select the “View” tab
- Select “Show hidden files and folders” option
- Uncheck “Hide protected operating system files”
- Click “Apply” and “OK” button
STEP 3: Locate Nesa encryption Virus startup location
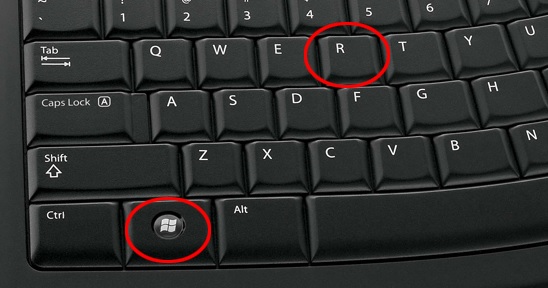
- Once the operating system loads press simultaneously the Windows Logo Button and the R key.
- A dialog box should open. Type “Regedit”
- WARNING! be very careful when editing the Microsoft Windows Registry as this may render the system broken.
Depending on your OS (x86 or x64) navigate to:
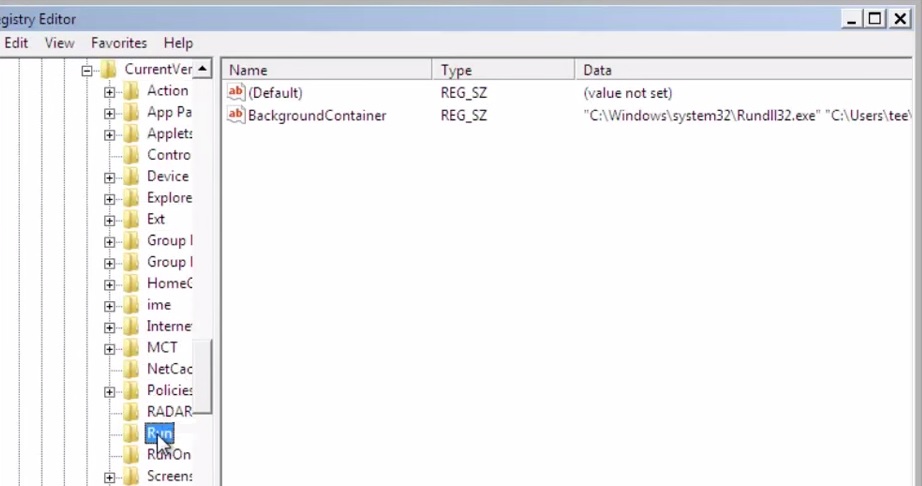
[HKEY_CURRENT_USER\Software\Microsoft\Windows\CurrentVersion\Run] or
[HKEY_LOCAL_MACHINE\SOFTWARE\Microsoft\Windows\CurrentVersion\Run] or
[HKEY_LOCAL_MACHINE\SOFTWARE\Wow6432Node\Microsoft\Windows\CurrentVersion\Run]
- and delete the display Name: [RANDOM]
- Then open your explorer and navigate to:
Navigate to your %appdata% folder and delete the executable.
You can alternatively use your msconfig windows program to double check the execution point of the virus. Please, have in mind that the names in your machine might be different as they might be generated randomly, that’s why you should run any professional scanner to identify malicious files.
STEP 4: How to recover encrypted files?
- Method 1: The first and best method is to restore your data from a recent backup, in case that you have one.
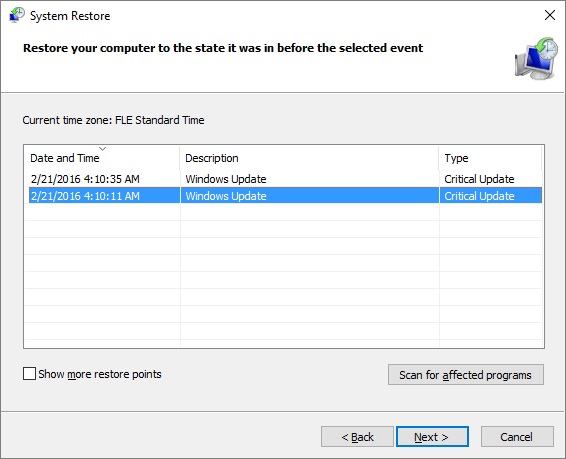
- Method 2: File Recovery Software – Usually when the ransomware encrypts a file it first makes a copy of it, encrypts the copy, and then deletes the original. Due to this you may try to use file recovery software to recover some of your original files.
- Method 3: Shadow Volume Copies – As a last resort, you can try to restore your files via Shadow Volume Copies. Open the Shadow Explorer part of the package and choose the Drive you want to recover. Right click on any file you want to restore and click Export on it.


